How to install the pipe flange?
Pipe flange installation is a process of connecting two pipes with the help of a flange, gasket, and bolts. In this article, we will talk in detail about the steps related to the installation of pipe flanges and the precautions before and after installation.


Tools and equipment required for pipe flange installation
Installing a pipe flange requires specific tools and equipment to ensure a secure and leak-free connection. Here are some of the tools and equipment required for pipe flange installation:
- Wrenches: A set of wrenches, including pipe wrenches, adjustable wrenches, and socket wrenches, is required to tighten the bolts that hold the flange and gasket together.
- Torque wrench: A torque wrench is used to tighten the bolts to a specific torque value. This ensures that the bolts are tightened to the correct tension and reduces the risk of over-tightening or under-tightening.
- Lubricant: A lubricant, such as an anti-seize compound, is used to prevent corrosion and make future disassembly easier.
- Gasket cutter: If the gasket needs to be trimmed to fit the flange, a gasket cutter or scissors can be used to cut it to the correct size.
- Wire brush/sandpaper: A wire brush or sandpaper is used to clean the pipe end and flange face, removing any rust or debris.
- Level: A level is used to ensure that the pipe is straight and properly aligned.
- Safety equipment: Safety equipment, including gloves and safety glasses, should be worn during the installation process to protect against injury.
By using these tools and equipment, you can ensure that the pipe flange is installed securely and safely. It is important to follow the manufacturer’s instructions and recommendations for installation to ensure a successful installation.


Preparatory work before installation of pipe flange
Before installing a pipe flange, there are several preparatory steps that should be taken to ensure a successful installation:
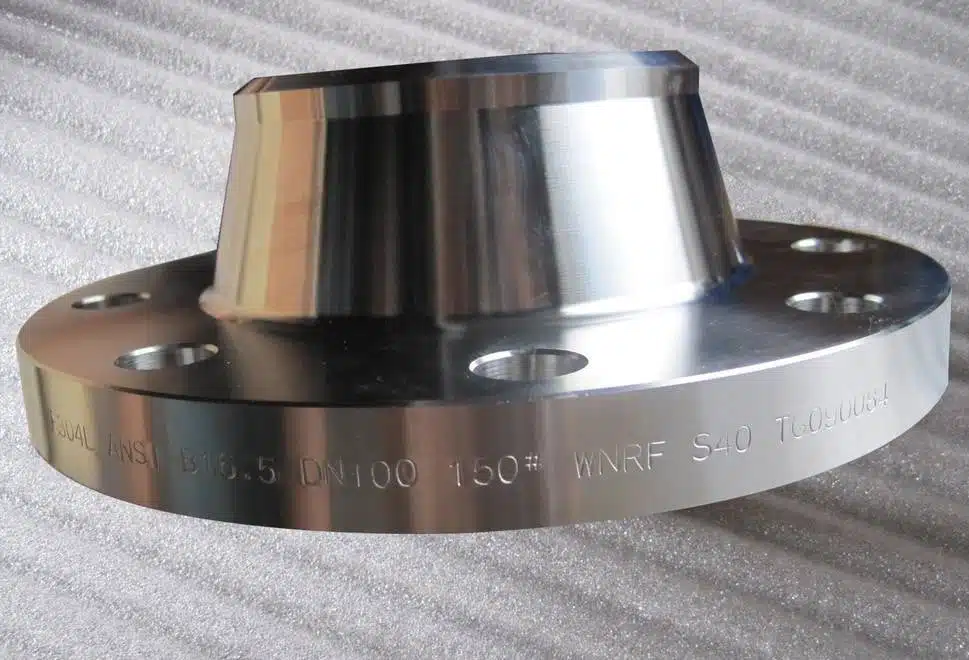
- Select the correct flange: Ensure that the correct type, size, and rating of the flange is selected for the specific application. Consider the pressure, temperature, and material requirements of the system.
- Check the pipe end: Ensure that the pipe end is smooth, clean, and free from any defects such as rust, debris, or dents. A clean and smooth surface will ensure a tight seal between the flange and the pipe.
- Check the gasket: Ensure that the gasket is the correct type, size, and material for the system. Check the condition of the gasket and replace it if it is worn, torn, or damaged.
- Check the bolts: Ensure that the bolts are the correct size, grade, and length for the flange and gasket. Check the condition of the bolts and replace them if they are worn, corroded, or damaged.
- Clean the flange faces: Ensure that the flange faces are clean, smooth, and free from any dirt, rust, or debris. Use a wire brush or sandpaper to remove any corrosion or rough spots.
- Lubricate the bolts: Apply a lubricant such as an anti-seize compound to the bolts and nuts. This will help prevent corrosion and make future disassembly easier.
- Check the alignment: Ensure that the flanges are properly aligned and the pipe is straight. Misaligned flanges can lead to leaks and gasket failure.
By taking these preparatory steps, you can ensure that the installation of the pipe flange will be successful and free from any issues.

Pipeline flange installation steps
- Prepare the pipe and flange surfaces: Make sure the pipe end and the flange face are clean, smooth, and free of any dirt, debris, or rust. Use a wire brush or sandpaper to remove any corrosion or rough spots.
- Place the gasket: Place the gasket between the flange faces, ensuring it is centered and in the correct position.
- Align the flanges: Slide the pipe into the flange, making sure the bolt holes are aligned. Use a level to ensure that the pipe is straight and properly aligned.
- Insert bolts: Insert bolts into the holes of the flange and finger-tighten them.
- Tighten the bolts: Tighten the bolts using a wrench, starting with the bolt opposite to the first one and moving in a star pattern. Tighten the bolts gradually and evenly until they are snug.
- Torque the bolts: Use a torque wrench to tighten the bolts to the recommended torque value. Check the torque value against the manufacturer’s specifications.
- Inspect the installation: Check the installation for any leaks or loose bolts. If there are any issues, re-tighten the bolts or replace the gasket as needed.
- Lubricate the bolts: Lubricate the bolts and nuts with an anti-seize compound to prevent corrosion and make future disassembly easier.
Note: Always follow the manufacturer’s instructions and guidelines when installing a pipe flange, and use the appropriate safety precautions to avoid injury or damage to the equipment.
Precautions after installation of pipe flange
After the pipe flange is installed, there are several things you should do to ensure that the installation is successful and the system is operating as intended:
- Inspect the installation: After the installation, inspect the flange and the surrounding area for any leaks, damage, or issues. If any issues are found, address them immediately to avoid further damage or safety hazards.
- Check the torque: Check the torque of the bolts after the system has been pressurized and allowed to stabilize. This ensures that the bolts are tightened to the correct torque value and are holding the flange and gasket securely in place.
- Monitor the system: Monitor the system for any changes in pressure, temperature, or other indicators of system performance. This will help identify any potential issues or leaks early on, allowing you to address them before they become more serious.
- Schedule maintenance: Schedule regular maintenance for the system, including inspections, cleaning, and replacement of any worn or damaged components. Regular maintenance will help ensure that the system operates safely and efficiently.
By following these steps, you can ensure that the pipe flange installation is successful and the system operates safely and efficiently. It is important to prioritize safety and follow the manufacturer’s recommendations for installation and maintenance.


Precautions for pipe flange installation
When installing a pipe flange, there are several precautions that you should take to ensure a safe and successful installation:
- Follow flange manufacturer’s instructions: Follow the manufacturer’s instructions and recommendations for installing the pipe flange. Each flange may have specific instructions or torque requirements that need to be followed to ensure a secure and leak-free connection.
- Use the right tools and equipment: Use the correct tools and equipment for the job, such as torque wrenches and lubricants. Using the wrong tools or equipment can result in damaged bolts, stripped threads, or improper torque values.
- Check the flange rating: Ensure that the flange rating matches the pressure and temperature requirements of the system. Using a flange with a lower rating than required can result in leaks, ruptures, or other safety hazards.
- Check the gasket: Ensure that the gasket is the correct size, type, and material for the system. A poorly fitting or incorrect gasket can lead to leaks and system failure.
- Check for alignment: Ensure that the flanges are properly aligned and the pipe is straight before installing the bolts. Misaligned flanges can lead to leaks and gasket failure.
- Tighten bolts gradually and evenly: Tighten the bolts gradually and evenly to avoid putting stress on one side of the flange. Unevenly tightened bolts can result in flange distortion, leaks, or gasket failure.
- Inspect the installation: After installation, inspect the flange and the surrounding area for leaks or other issues. If any issues are found, re-tighten bolts or replace gaskets as needed.
By taking these precautions, you can ensure a safe and successful pipe flange installation.
Author: Lewis Liu
Hello, my name is Lewis Liu, and I’m a professional sales engineer with over a decade of expertise in the flange fittings sector.
I am quite informed about flange selection, installation, and maintenance. I am passionate about providing customers with the greatest solutions for keeping their pipeline systems running smoothly, safely, and dependably.
If you have any queries or concerns concerning flange fittings for your pipelines, whether they are about selection, material choice, specification requirements, or anything else, please contact me at any time. I am dedicated to providing expert advice and assistance to help you make educated decisions and reach your objectives.